Before connecting, it’s important to know that there are two main types of wireless mice:
USB Receiver (Dongle) Mouse: Comes with a small USB receiver that plugs into your laptop.
Bluetooth Mouse: Connects directly via Bluetooth without needing a dongle.
1. Insert the Batteries
Open the mouse battery compartment and insert the required batteries if it is not rechargeable.
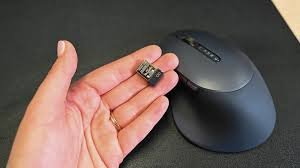
2. Plug the USB Receiver Into Your Laptop
Insert the USB receiver into one of your laptop’s USB ports. Most laptops will recognize it automatically.
3. Turn On the Mouse
Switch on the mouse using the small power button usually found underneath.
4. Wait for Automatic Installation
Your laptop should detect the new device and install any necessary drivers automatically. Once done, you can start using your mouse immediately.
1. Turn on Bluetooth on Your Laptop
On Windows: Go to Settings > Devices > Bluetooth & other devices and toggle Bluetooth on.
On Mac: Go to System Preferences > Bluetooth and turn it on.
2. Power On the Mouse and Enter Pairing Mode
Most Bluetooth mice have a dedicated pairing button. Press and hold it until the LED indicator flashes.
3. Pair the Mouse with Your Laptop
On your laptop, click Add Bluetooth or other device and select Bluetooth.
Choose your mouse from the list of available devices.
Click Pair or Connect. Your mouse should now be ready to use.
Check Batteries: Ensure they are inserted correctly and are charged.
Stay Within Range: Stay within 10 meters (about 33 feet) of your laptop for the best connection.
Reconnect if Needed: Sometimes you may need to remove and re-add the Bluetooth mouse if it fails to connect.
Update Drivers: Keeping your Bluetooth or USB drivers updated helps avoid connection issues.
Connecting a wireless mouse to your laptop is simple once you know whether you’re using a USB receiver or Bluetooth. With just a few quick steps, you can enjoy the freedom of wireless navigation and improve your laptop experience.

Comments